Posts

The process of manufacturing efficient and high-performance industrial pumps involves a series of inspections and tests, both before and after assembly.  This series of tests is essential to verify that the production processes have been carried out according to the manufacturing criteria and the required standards. It is essential to bear in mind that, during their operation, pumps are normally exposed to numerous factors such as:

Mechanical stress.
Hydraulic loads.
Thermal variations.
Environmental factors.

Therefore, the manufacturer must ensure that the pumps are ready to deal with all these factors to ensure efficient and reliable performance, even in worst case scenarios.

Non-destructive testing for industrial pumps

Non-destructive testing is a great way to verify if the pumps being manufactured are ready to operate efficiently and reliably.

Some common non-destructive tests performed on pumps include:

Ultrasonic tests

Ultrasonic tests are a great way to verify the performance of different areas of the pumps. Common areas tested with ultrasound technology include:

  • Material thickness
  • Material hardness
  • Material cracks and other discontinuities
  • Corrosion
  • Integrity of welds

It is clear that verifying the performance of the areas mentioned above is essential during and after the production of the pumps to guarantee proper operation.

This type of tests can be performed with tools such as:

  1. Ultrasonic thickness gauges
  2. Ultrasonic hardness testers
  3. Ultrasonic flaw detectors
Ultrasonic hardness tester

In photo: Ultrasonic hardness tester SAMA Tools

Magnetic particle detection

These types of tests can be performed by measuring instruments such as our ultrasonic thickness gauges, ultrasonic hardness testers or ultrasonic flaw detectors.

As the name suggests, this type of non-destructive test uses the magnetic particle method for the detection of possible flaws on the surface or at sub-surface levels of the materials.

This test is particularly useful to verify the integrity of welded areas and casting parts, and helps to identify cracks and other defects before the pump goes into operation.

Tools such as our AC/DC magnetic detector and our digital gaussmeter can be of great help when performing magnetic particle tests on pumps.

AC/DC magnetic detector and our digital gaussmeter

In photo: AC/DC magnetic detector and our digital gaussmeter SAMA Tools

Dye penetrant testing

This is a test to verify the integrity of materials. It takes advantage of highly capillary liquids that are used to reveal possible defects and discontinuities on the material. This helps identify problems in welds, and other critical areas in the pumps.

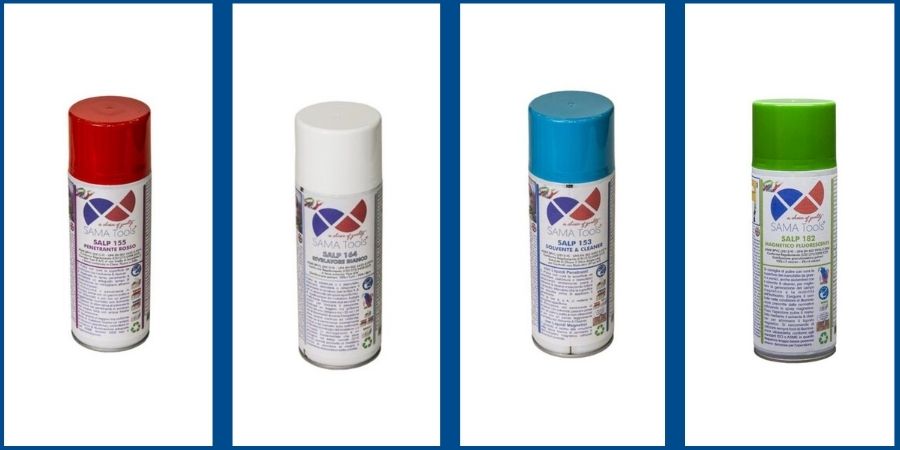
Some penetrating liquids we offer include:

  • Fluorescent penetrant spray
  • White penetrant spray
  • Red penetrant spray

These are three important non-destructive tests that are recommended to guarantee that pumps are ready to withstand the factors mentioned above, especially those related to the operation of machines, such as mechanical and hydraulic loads.

Nevertheless, there is another important aspect to verify during production, as well as after some time, when maintenance is required.

Read on as we explain further.
Penetrant spray

In photo: Penetrant spray SAMA Tools

Coatings that protect against corrosion and other environmental factors.

Industrial pumps that are exposed to the environment, especially under tough conditions, require special protection to guarantee operation without failure.

A common practice is the application of special coatings to protect against corrosion and other environmental effects. To achieve the required coating protection, both the surface of the materials being coated and the coating applied need to comply with certain requirements.

Some examples of these requirements are:

  • Adequate surface roughness
  • Proper adherence of the coating
  • Correct coating thickness
  • Expected coating elasticity
  • Specific hardness and abrasion resistance

To verify compliance with these requirements, some tests and measurements must be carried out. Some of the required tools include:

In addition, pumps must be designed to very tight tolerances and the require high-precision manufacturing processes to operate as efficiently as possible.  Furthermore, these tolerances must be maintained throughout their lifespan. However, thermal variations from operation or from exposure to the environment in different seasons may affect the dimensions of the different parts, thus deviating from the tolerance ranges.

A good way to ensure the parts of the pump are within the tolerance range, and to identify if thermal variations are having an impact, is by verifying their dimensions.

However, for some parts, dimensional verifications may require special measuring instruments. But any manufacturer striving for excellence knows the investment is worth it. And this is the case for several of our customers  that work in this sector.


quality control

Photo by www.canva.com

Other tests to produce high-performance industrial pumps

There are also special measuring instruments that help the customers guarantee that the dimensions of the different parts of the pumps and pressure units comply with their standards.

Among the most popular tools, there are the outdoor micrometers with exchangeable anvils and carbide tipped measuring faces  – SAX101

With these instruments, even the largest parts of the pumps, including the external coverings, can be measured, while ensuring compliance with tolerances down to 0.01 mm.

Failure to comply with dimensional tolerances could result in a reduction in the efficiency and/or reliability of the products, and can lead to several consequences such as:

Customer dissatisfaction
Negative feedback about the company
Reduced profitability

To ensure high quality pumps and avoid unwanted problems, it’s crucial to implement effective quality control (QC) and quality assurance (QA) processes by using the right tools.

Fortunately, you can rely on the SAMA Tools name-brand to provide you with a wide range of mechanical measuring instruments, such as outdoor micrometers, calipers and dial gauges, as well as a variety of non-destructive testing tools.

Our mission is to support our customers in their commitment to quality control, and for this we are dedicated every day to offer first-class solutions.

If you need assistance in choosing measuring instruments or if you would like specific advice regarding your unique situation, do not hesitate to contact our technical department.

You can call us at 05843923420584392453 or write to sales@samatools.it


For companies that make coatings and paint finishes a core part of their business, thickness measurement is a vital process to ensure that products comply with standards and meet design requirements.

Coating thickness measurement is a precise, non-destructive method of verifying the thickness of coatings applied to the surface of a part, increasing product life and reducing long-term costs. Furthermore, it guarantees a perfect balance between aesthetics and protection of the painted product.

In this article, find out how measuring the thickness of coatings can help your QC department identify coating issues, protect your products and achieve aesthetic perfection.

What is Coating Thickness Measurement?

As the name suggests, coating thickness measurement is a non-destructive testing method to measure the thickness of a coating applied on the surface of a piece.

Besides maintaining the integrity of the part, an interesting aspect of this non-destructive measuring method is that it can be applied to both dry and wet coatings. The main difference between dry and wet coating thickness measurement will be the type of instrument employed.

Why is coating thickness measurement essential in many industries?

Measuring the thickness of coatings is a very important verification process for companies that produce paints and coatings. This activity consists in the precise measurement of the thickness of a coating applied to the surface of a piece, without causing damage or alterations to the surface itself.

This method is non-destructive and can be performed on both dry and wet coatings, depending on the tool used.

Coating thickness measurement is essential to verify that coatings comply with standards and design requirements, reduce material costs, and ensure product life and protection.

It can be performed during the inspection of incoming goods or during production and is commonly used by quality control and maintenance departments to identify problems such as loss of coating, incorrect thickness or non-compliance with requirements.

Being able to timely identify any problems with the coating allows for a longer life of the coated part and a very significant reduction in long-term costs.

Furthermore, an appropriate layer of coating helps achieve the desired balance between aesthetics and protection of the painted part.

Coatings that are too thick can lead to aesthetically unwanted results, as well as the appearance of possible paint cracks that would ruin the piece.


High accuracy digital coating thickness gauges - SA8850

Watch the video: High accuracy digital coating thickness gauges – SA8850

How to measure coating thickness?

As described above, there are two ways of measuring coating thickness: dry coating thickness measurement and wet coating thickness measurement.

Dry measurement is usually used to measure any insulating layer applied on a metal substrate, such as paint and plastic layers. It is carried out by means of coating thickness gauges, such as our high accuracy digital coating thickness gauges able to accurately indicate the thickness of each type of coating or paint present on ferrous (magnetic) and non-ferrous (non-magnetic) metal supports.

Coating thickness gauges use the magnetic induction measuring principle for ferrous base coatings and the eddy current measuring principle for non-ferrous base coatings. In addition to paint thicknesses measurement, these instruments can measure different types of coatings applied to sub-layers or from galvanic baths such as anodizing, chrome plating, galvanizing, etc.

On the other hand, wet measurement is usually used as part of the painting or coating application process, since it does not require the coating and varnish layer to be completely dry. This is especially useful for coating service providers, as it allows them to immediately adjust the coating layer as necessary without the need of post processing.

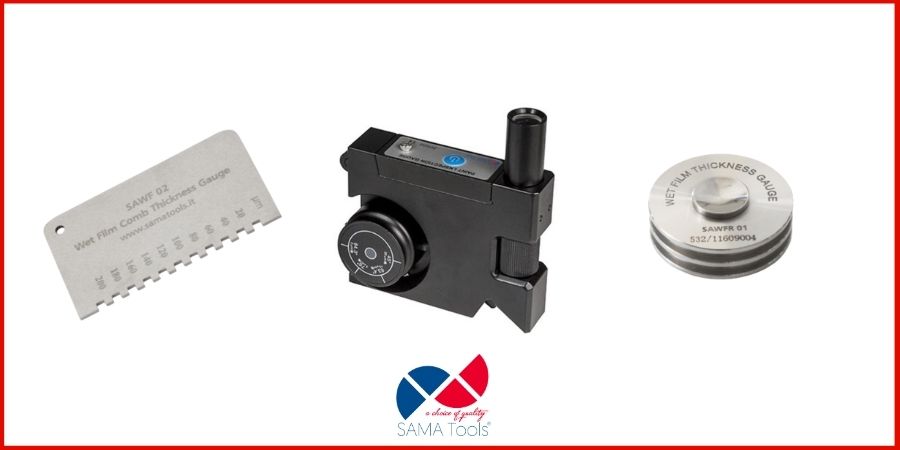
Common examples of wet coating thickness measuring instruments are our comb-shaped thickness gauges and rolling wheel wet film thickness gauges.

What are the applications of coating thickness measurement?

As mentioned above, coating thickness measurement is essential for many industries.

Some of the sectors that commonly perform coating thickness measurement include, but are not limited to:

  •  Automotive.
  •  Aerospace.
  •  Marine sector.
  •  Commercial vessels.
  •  Mega yachts sector.
  •  Oil & Gas.
  •  Chemical.
  •  Construction.
  •  Electronics.

Thickness gause fiels of application

Common activities in these sectors that require coating thickness measurement are:

Piping inspections in the oil and gas, and chemical sectors to avoid corrosion issues that may result in pipe failure, costly shutdowns and industrial accidents.

Checking the paint coating consistency on an aircraft or component in the aerospace industry for improved safety and performance.

Nautical and maritime maintenance, like in the case of bulkheads, tanks, ship hulls, and other coated components.

 Verifying the integrity of pressurized containers such as fire extinguishers, gas tanks, industrial boilers and others that depend on coatings for corrosion protection.

Maintenance inspections on bridges, especially those with metal structures, which are coated to withstand the harshest environmental conditions.


How to choose a coating thickness measuring instrument?

Selecting the right coating thickness measuring instrument for your specific application is very important, since making a wrong choice may result in a total inability to obtain any value or obtaining false information.

Any of the aspects mentioned above means undesired consequences such as increased costs, customer dissatisfaction and loss of reputation.

To avoid all these problems, some aspects must be considered in order to select the right coating thickness measurement for your application:

  •  The coating type, whether it is dry or wet.
  •  The type of coating and material coated.
  •  The roughness of the coating. This also affects the type of probe to be used.
  •  The area measured and its location.
  •  The geometry of the part being tested.

At this point, it is also important to highlight that there are destructive methods to measure coating thickness, as well.

For example, our paint inspection gauge (P.I.G.) – SAPIG548 provides high accuracy measurements in the range of 2-2800µm on every substrate, like steel, non-ferrous metals, plastics, wood, concrete, plaster, etc. with the aid of a built-in microscope, that allows you to measure the thickness of each layer.  Thanks to its microscope, this instrument measures  both the total thickness of the coating and each single layer deposited on the substrate.

You can also read our guide on ultrasonic thickness measurement.

Coating thickness gauges

Coating thickness gauges – SAWF, SAPIG548, SAWFR

Nevertheless, the integrity of the part is not maintained as this is a destructive test.

Conclusion

So far we have seen that thickness measurement has several crucial functions:

  • Quality control: The measurement of the thickness of the coating allows one to verify that the thickness of the coating complies with the design requirements and the reference standards. This way, companies can ensure that they produce quality products that meet customer expectations.
  • Corrosion Prevention: A proper coating layer helps prevent corrosion of metal products. Coating thickness measurement helps to identify any layer leakage that could cause corrosion.
  • Long-term cost reduction: Coating thickness measurement allows you to identify any coating issues in a timely manner, which increases product life and reduces costs , long term.
  • Balance between aesthetics and protection: A suitable coating layer allows you to achieve the desired balance between aesthetics and product protection. Coatings that are too thick can be aesthetically undesirable and cause paint cracks which damage the product.

Regardless of the application, we have different types of coating thickness gauges for all your needs.

If your interested in seeing the instruments that we offer for measuring the thickness of dry and wet paints and coatings, just click here.

Instead, if you are still unsure or have any doubts about this type of measurement, we advise you to contact us at 0584/392342 or 0584/392453 and one of our trained professionals will be happy to assist you.