Posts
Many visitors had the opportunity to personally test our innovative tool during the last edition of the MECSPE International Fair for the manufacturing industry.
For those who missed out, we invite you to explore our latest device: the SAUT6100D-SW – Graphic Thickness Gauge, through this detailed article that illustrates all its capabilities.
This addition to our extensively tested and well-known lineup of ultrasonic thickness gauges comes with enhanced features for even greater performance.
Join us in uncovering how this new SAMA Tools product operates and the specific materials it was crafted for.
What does the Graphic Thickness Gauge for fiberglass do?
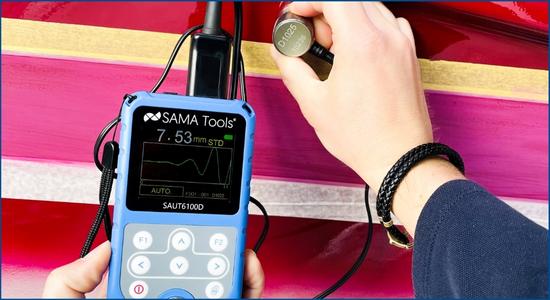
The SAMA Tools name-brand SAUT6100D-SW thickness gauge is a very precise instrument capable of measuring thickness through painted or coated surfaces.
A decidedly innovative and state-of-the-art product that offers advanced functions that can be adapted for various uses, in many industrial sectors.
It can be used on metallic and non-metallic materials such as steel, aluminium, titanium, plastic, ceramic, glass and other ultrasonic wave conductors.
However, this instrument has something more that distinguishes it from other models, making it particularly suitable for certain types of measurements.
It is equipped with the SAPT-4000 probe that makes it suitable for measuring various composite or laminated materials, such as fiberglass.
This type of material is widely used in the boat manufacturing industry for recreational and work crafts. In fact, boat manufacturers and marine inspectors need to accurately measure the thickness of the hulls.
Useful in various industries, it’s an innovative tool used to carry out different measurements compared to the standard ones, on processed materials such as fiberglass.
What are the advantages of the thickness gauge?
This gauge is ideal for any type of application due to its compatibility with a wide range of single and dual element transducers.
Its versatility makes this thickness gauge particularly useful and is highly recommended in the naval, aerospace, aeronautical sectors, but is also useful in the automotive and oil & gas industries as well.
6 reasons to choose this model:
- Compact and robust with rubber protection
- Graphic color display
- Can be equipped with different probes
- 3 measuring modes: A-Scan; B-Scan; Digits
- Wide measuring range
- THRU-COAT® function on painted surfaces
Where can you purchase the thickness gauge for fiberglass?
If you too have to measure the thickness through painted or coated surfaces, you now have a powerful ally that will save you time and allow you to work with peace of mind.
Call or write our technical and sales department. We will help guide you in choosing the best product for you.
How to know if it’s the right tool for you?
If you have particular needs, it may be necessary to take some time to consult the technical data sheets, but strategically, it’s also a good idea to perform some tests on samples.
Therefore, after talking with our technicians and consulting the supporting material, once we have an idea of budget and if the right conditions are present, we can consider asking you for samples to carry out tests.
Only if the outcome is positive will you be able to proceed with the order.
Measuring and control instruments are very important resources in any production process. During any process, there are many parameters and properties that need to be carried out with precision to guarantee that high quality standards are met.
So, how to choose the best supplier for measuring and control instruments?
5 aspects to consider when choosing your measuring and control instruments supplier
There are different aspects you should consider when selecting your measuring and control instruments provider. The most important ones are the following:
1. Quality of the instruments
This may sound obvious, but the quality of the measuring and control instruments is of uttermost importance, since this will have a great impact on the results of all your Quality Control (QC) and Quality Assurance (QA) activities.
For example, S.A.M.A. Italia is a UNI EN ISO 9001 certified company. A certified supplier confirms that you are choosing a company with clear procedures, aimed at providing accurate services.
S.A.M.A. Italia is a supplier that operates worldwide and supplies companies with its own name-brand SAMA Tools instruments. Therefore, a reliable and experienced supplier from whom you can receive high quality tools.
Moreover, all SAMA Tools instruments are manufactured to comply with the reference standards.
2. Calibration
As defined by the experts at S.A.M.A. Italia, “calibration means to identify metrological characteristics of a measuring instrument. It can be defined as a “photograph” of the instrument in its current state. This is the result of a comparison with a reference sample and does not contemplate the adjustment of the instrument.”
This is an important aspect because one can purchase a “quality” instrument which is not calibrated, and therefore, may need adjusting. As a result, the instrument won’t work properly and it will most likely cause problems.
To prevent this from happening, S.A.M.A. Italia offers calibration services and supplies Laboratory Test Reports in compliance with UNI CEI EN ISO/IEC 17025 and ACCREDIA certificates on all their instruments, but also on equipment you may already own and of other brands.
How often should the measuring instruments be calibrated? We talked about it here.
3. Destructive or non-destructive testing instruments?
When we talk about measuring and control instruments, we generally mention two categories: destructive and non-destructive testing instruments.
As the name implies, destructive testing requires altering or destroying the sample in order to identify its mechanical characteristics.
If you want to carry out measurements and tests in your production process without damaging your sample, the best alternative is non-destructive testing, such as:
- Visual tests
- Flaw inspection
- Roughness measurement and control
- Ultrasonic thickness control
- Coating thickness control
- Hardness testing
- Environmental control
This will allow you to directly identify properties and mechanical features on the final product without damaging it. And SAMA Tools offers you the best instruments for each of these tests.
4. Technical support
When we see the words “technical support”, most of us immediately think about fixing or repairing something. However, the technical support you should look for when selecting your measuring and control instruments provider must be a more complete kind of service.
As the S.A.M.A. Italia Export Manager Martina Guatteri says,: “It is well known that every successful company has excellent after-sales assistance.” This should be part of what you should look for”, but as she also says, “pre-sales assistance is also very important.” Yes, S.A.M.A. Italia ships its tools worldwide!
It’s important to find a supplier that can really understand your needs and provide you with the best solutions for you, keeping your best interests at heart.
Moreover, having solid technical support means making sure you won’t have any problems while using the instruments, and assistance on how to use them properly.
S.A.M.A. Italia offers all their customers a complete metrological consultancy service and care for every need from the very beginning. They help you become an independent user of their instruments, with specialized technicians that will assist you during installation, if required, and during the first stages of testing and measuring. And you will gain an understanding that goes far beyond simply reading a manual.
5. Do you need portable instruments?
It is not always possible to install a device in a laboratory or withing processes to test and measure important parameters. Most of the time, when dealing with QC and QA, you need to measure “on the fly” and this means having a light and portable tool, suitable for measuring in the field.
S.A.M.A. Italia can provide you with a wide range of portable instruments while maintaining the highest quality on the market.
Some examples of portable tools are:
- Portable surface roughness testers
- Ultrasonic thickness gauges
- Ultrasonic flaw detectors
- Portable external load cell torque testers
- Micrometers and calipers
- Sound level meters
- Luxmeters
- Portable pH meters
- And many more…
If you work in the industrial painting sector, you will surely find this article interesting, as well.
What if I am an international customer?
Being a worldwide leader in measuring control and instruments and as was mentioned above, S.A.M.A. Italia exports its products all over the world.
You can count on Export Manager Martina Guatteri, who is specialized in customs procedures, to be able to provide you with the necessary help in customs procedures, and on Amina Fera, who is equally available to help you during the purchase phase to choose the best instruments for your needs.
You can contact the Export Representatives at: export@samaitalia.it
Feedback from around the world
Read about what some of S.A.M.A. Italia’s international customers have to say about their experiences with SAMA Tools measuring and control instruments.
Zafer
KAYALAR KİMYA – Turkey
“The whole process was completeed without any problems. We got answers to all the questions we asked. Thank you for your attention.”With over 45 years of experience, Kayalar Kimya is one of the world’s leading paint manufacturers.
Vitaliy Shinkus
LLC Tehsnabimport – Ukraine
“Thank you for your prompt response and help in choosing the right tool. Was very pleased. I recommend working with this company to everyone.”LLC Tehsnabimport is a distributor of measuring instruments in the Ukraine.
Malik Jamil Asghar
AL ESSA & HADDAD Trading & Decorating Co – Kuwait
“We are satisfied with your services and with the swift feedback from your Team.”Founded in Kuwait in early 1978, Al-Essa & Haddad Trading and Decorating Co. is well-established Aluminium Company that manufactures aluminium door windows and sales reinforcement steel bars, aluminium profiles, accessories, etc.
Miihailo Radojičić
TIM CO DOO – Serbia
“Everything is always correct and precise with the S.A.M.A. company. Friendly employees, always ready to help! Greetings from Serbia!”TIM CO is a Serbian company created as Medical Equipment Service, founded in 1993. They began by producing printers for nuclear medicine and presently also cooperate with companies that create equipment geared towards women’s health and dental radiology.
Kateryna Andersson
NYLI METROLOGY AB – Sweden
“Very happy with quick support and help to find the best instument for our needs! Nyli Metrology is a Swedish company that provides its customers with various services related to metrology and is also a distributor of SAMA Tools name-brand instruments.
Why I recommend S.A.M.A. Italia as a supplier for measuring and control instruments?
So far, you’ve read how S.A.M.A. Italia ticks all the boxes and how it’s considered to be a first-class measuring and control instruments supplier.
My direct experience with them has enabled me to appreciate their professionalism and clear communication, which makes every customer feel confident in having chosen the best option.
Furthermore, you can subscribe to their English newsletter for free and receive an ebook filled with valuable information.
On the other hand, if you’re located in Italy, subscribe to the Italian newsletter.
Therefore, this winning combination of high quality products and services is a great solution for anyone who’s looking for a supplier of measuring and control instruments. Don’t hesitate to contact S.A.M.A. Italia now. You’ll be glad that you did!
Mechanical engineer
In this article, we will explore some measuring and control instruments (such as the viscometer), which help verify the suitability of coatings and paints while making sure the properties meet the requirements of specific applications such as:
- Corrosion protection
- Adhesion
- Protection of materials against degradation
- Thermal insulation
- Fireproof protection
- Electric insulation

Photo by www.canva.com
What is runoff time?
Flow or runoff time is a property that can give us an idea of the viscosity of a Newtonian fluid.
In other words, it’s a fluid whose viscosity does not vary with the speed at which it is measured.
By measuring the runoff time of a coating, it’s possible to determine its kinematic viscosity. This result informs as to its suitability for the desired application.
How do I measure runoff time? Kinematic viscosity
The most common way to control coating flow time is by means of flow cups.
As the name suggests, flow cups are cup-shaped tools, which are used to quickly determine the flow time and kinematic viscosity of Newtonian fluids.
The process of measuring the flow time when using a flow cup consists in verifying the time it takes for a Newtonian fluid to escape from the small orifice located at the base of the cup itself.
The advantages obtained by using flow cups to determine the flow time (kinematic viscosity) of a coating are:
- Simplicity and portability.
- Quick results.
- Any Newtonian fluid can be tested with accurate results.
Flow cups are normally classified according to reference standards.
The most common types include:

In photo our flow cups models
What are flow cups most commonly used for?
Flow cups are commonly used to check the physical characteristics of different coating materials such as paints, inks or lacquers.
As a result, almost any industry using these kids of coatings can benefit from the flow cups described so far.
However, the most common industries where they are used include:
- Ceramics
- Food and drink
- Automotive
- Chemical products

Photo by www.canva.com
What is the coating dynamic viscosity coefficient?
The dynamic viscosity coefficient of a coating represents the resistance value of the coating particles to movement or stress.
- Reduced costs that may result from adding unnecessary layers of coating.
- Reduced processing times.
- Increased productivity.
- Increased profitability.

Photo by www.canva.com
How to measure the dynamic viscosity coefficient
The dynamic viscosity coefficient of a coating can be measured and controlled in several ways.
However, there is one instrument that excels beyond the others in terms of performance: it’s the digital rotary viscometer.
The digital rotary viscometer, like our SAVISC186 model, allows you to check the dynamic viscosity of the coating at a specific operating temperature.
This is important because temperature is one of the environmental aspects that can have the most impact on the viscosity of your coating.
The process of measuring the dynamic viscosity with a digital rotary viscosimeter starts by pouring a sample of the coating into a container and placing the container so that the spindle of the viscometer is inside the coating.
After that, the spindle rotates at a constant speed and the viscometer measures the torque value to determine the viscosity.

In photo: Digital rotary viscometers – SAVISC152
What are digital rotary viscometers most commonly used for?
Many industries depend on viscosity control and therefore use rotary viscometers.
Specifically, these types of tools are particularly useful when checking dynamic viscosity in non-Newtonian fluids.
The most common applications of rotary viscometers are found in the following industries:
- Oil and gas
- Chemical products
- Pharmaceutical
- Food and drink
- Laboratory testing
- Scientific research

Photo by www.canva.com
How to choose the right instrument?
Choosing the right instrument for checking the physical characteristics of coatings is essential to ensure accurate results and the correct coating application.
To make the best choice, it’s important to consider several factors including:
- Type of coating material (Newtonian or non-Newtonian).
- Standard used for the measurement.
- Whether temperature control is necessary.
- The need for portability.
[Video] How to measure the viscosity? Viscosimeter – SAMA Tools
SAMA Tools is a trusted brand for the purchase of instruments used for checking the physical characteristics of coatings. We offer a wide range of quality products, suitable for all needs and at affordable prices. Furthermore, we are committed to providing the best possible experience for all our customers, with pre, during and post sales assistance.
The quality control (QC) of the coating on commercial vessels and mega yachts is a very important process to ensure that both desired aesthetics and performance are achieved.
In fact, this is true for the entire marine sector, including new constructions and refits of ships, yachts, offshore structures and accessories.
Obviously, coatings are very important for commercial vessels and mega yachts since they are exposed to a very corrosive environment. So, maintaining the highest performance level is essential for the integrity of the vessel, along with its aesthetics.
How is the quality control of coatings performed?
There is a very important preparation and painting process before a commercial vessel or a mega yacht is ready to set sail, and it includes a quality control step.
The quality control of the coating on commercial vessels and mega yachts involves the measurement of paint thickness applied. This thickness can be measured both dry (DFT) and wet (WFT).
Dry coating thickness measurement is performed during quality control and maintenance inspections. On the other hand, wet coating thickness measurement can be performed during the preparation and painting process since it does not require the coating to be completely dry as the name suggests.
The most common coating thickness measurement instruments are coating thickness gauges. They are used to measure dry layers applied on a metal substrate, such as paint and plastic layers. A good example of these instruments are the high accuracy digital coating thickness gauges.
Coating thickness gauges work on both ferrous (magnetic) and non-ferrous (non-magnetic) metal parts. Depending on the material, the instruments will use either the Magnetic Induction or the Eddy Current measuring principle.
However, for wet coating thickness measurement, different types of gauges are used, which include the comb-shaped thickness gauges and the rolling wheel wet film thickness gauges.
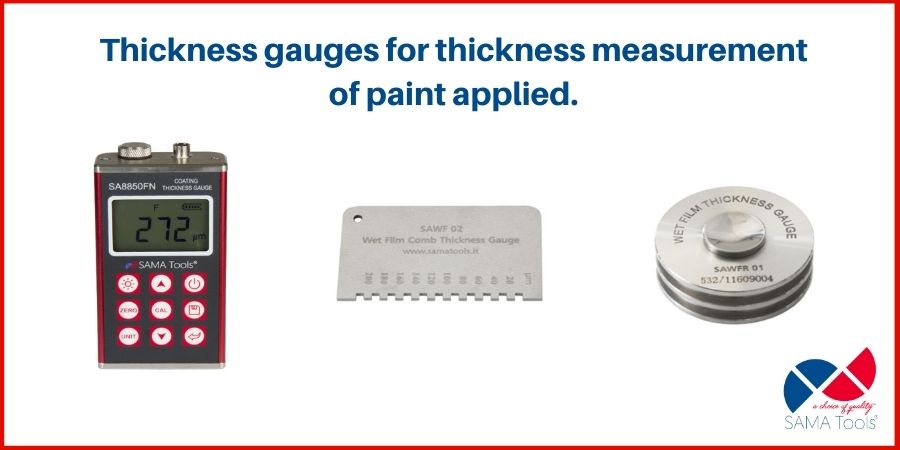
In the picture above SA8850, SAWF and SAWFR
Quality control at MCR Marine
MCR Marine Srl is a company which is formed by a group of professionals who specialize in the coating and painting industry, and provide technical support before, during and after preparation and painting on commercial vessels and mega yachts.
The service they offer not only covers the painting of the vessel, but also the preparation and coating of accessories. In addition to the sectors mentioned above, MCR Marine is able to provide assistance to the entire marine sector.
MCR Marine Srl provides two main ways to guarantee the quality of their services:
• Certified Inspectors by the major world bodies: Frosio, Nace, RMCI.
• Quality control tools and instruments properly calibrated according to the highest standards.
How calibrating quality control instruments helps MCR Marine Srl?
As we mentioned above, MCR Marine Srl prepares and paints commercial vessels and mega yachts.
Quality control is essential in their activities.
By using the right tools for the verification and evaluation of different activities such as material hardness and coating or painting thickness, they can guarantee high-quality results to their customers.
However, as with any other tool or instrument, measuring instruments need to be periodically calibrated to ensure the values obtained are really accurate.
If quality control is performed with measuring instruments that are not calibrated, the operator might make mistakes, such as requesting extra coating which can result in delivery delays or even worse, sending vessels to the customer with deficient coating which may result in premature failure.
So, how do the experts of MCR Marine make sure their tools and instruments are properly calibrated to match their high-quality standards?

Above: Photos of a Quality Control Department (Canva.com)
SAMA Tools calibrating services: The best option
Apart from counting on SAMA Tools as the provider of their tools and instruments for the quality control for the preparation and painting process of the commercial vessels and mega yachts, MCR Marine periodically sends their instruments to our headquarters for calibration.

In the picture aboce Shore analog hardness testers – SA6410
One of the instruments, we calibrate for them is the shore analog hardness testers – SA6410 a non-destructive instrument used to measure hardness of parts made of rubber, plastic, stucco, sponges and similar materials. Other tools and instruments, we calibrate for MCR Marine Srl are coating thickness measurement instruments.
MCR Marine relies on our calibration services because we help them comply with the UNI EN ISO 9001 standards.
Moreover, in case the adjustment of the instrument is required to fulfill calibration requirements, we offer such adjustments, as a specialized separate service to guarantee their needs are covered.
Through this specialized service, the experts at MCR Marine have always been able to guarantee above satisfactory results to their customers. Working closely together has allowed us to develop a strong relationship that we are looking forward to maintain for a long time.
In the video above: High accuracy digital coating thickness gauges – SA8850
Now it’s up to you!
We strive to provide our customers with the best solution for their specific needs. Customer satisfaction is our top priority and we would be delighted to have you on board with us.
So, if you need help with calibration, or would like advice on the best instrument for your specific case, do not hesitate to contact our technical department.
You can call us at 0584/392342 – 0584/392453 or, alternatively, book a video meeting.

