Posts

The calibration report of ultrasonic thickness gauges

The calibration report for ultrasonic thickness gauges includes traceability to primary standards and describes the process used to calibrate the instrument, as well as the calibration values obtained using primary reference standards.

This process involves measuring the known thickness of a standard primary sample using the ultrasonic thickness gauge, and then comparing the measured value with the known value of the primary sample.

Then helps determine if there are any deviations or discrepancies and whether the instrument needs adjusting.

This is why, it’s important to clarify that calibration is like a photograph of the instrument in its current state. Therefore, any adjustments that are required are part of a different and optional service, to be requested separately.

What information does a thickness gauge calibration report include?

The calibration report with traceability to primary standards includes the following information:

  1. recipient/addressee of the calibration report;
  2. instrument ID and specifications;
  3. technical procedure used for calibration;
  4. primary standards used for traceability;
  5. values measured by the instrument;
  6. deviation between known and measured values;
  7. calibration date (calibration expiry date is also available upon request).

The calibration report serves as proof that the instrument has been calibrated and helps ensure that it is reliable when it comes to measuring thickness.

How long does it take to receive a calibration report?

The time required to receive the calibration report for ultrasonic thickness gauges can vary, depending on several factors such as the availability of specialized technicians, the quantity of instruments to be calibrated, the complexity of the instruments, etc. However, in general, the time required to obtain the calibration report for ultrasonic thickness gauges can be estimated between 1 and 3 business days.

Calibration report

Calibration Report vs. ACCREDIA Calibration Certificate: The differences that not everyone knows

As we have already seen in previous articles, the calibration report with traceability to primary standards differs from the ACCREDIA calibration certificate.

The time and cost for an ACCREDIA calibration certificate are also greater than those for a calibration report.

The customer must therefore decide which of the two documents is more suitable for his/her needs, based on, for example the specific applications of the measuring instrument. If the instrument is used for critical applications which require a high level of accuracy and official calibration recognition , then it may be necessary to request an ACCREDIA calibration certificate. However, if the instrument is used in less critical applications or for internal company use, a calibration report with traceability to primary standards may be sufficient.

To learn more about the differences, please read the article:  Quality control certificate or calibration report?

Why rely on S.A.M.A. Italia for calibration services?

If you want to ensure that your products are of the highest quality and increase customer satisfaction, rely on our calibration services with traceability to primary standards for your ultrasonic thickness gauges.

By doing so, you will be certain if your measuring instruments are accurate and reliable for measuring the thickness of your products.

Furthermore, we’ll send back your calibrated instruments quickly, allowing you to work no interruptions.

S.A.M.A. Italia is a member of UNI, the Italian Association for Standardization. This allows us to have access to the technical reference standards and to stay constantly updated on news relating to our sector.

We can therefore offer customers a highly professional service, based on technical standards and best operating practices.

We are proud to have already helped customers from various sectors and the testimonials that you can read by clicking on the image below, represent tangible proof of the effectiveness of our measuring instruments and calibration services. Don’t hesitate to read on since they are a great example of the wide range of our quality control activities.

For more information on our calibration services, contact us at:

Telephone: 0584/392342 or 392453
Email: export@samatools.it

We are at your disposal for any requests or clarification.

In the world of quality control, precision and accuracy are paramount.  As a leading supplier of measuring tools and calibration services, S.A.M.A. Italia proudly presents four success stories that highlight the importance of quality across various industrial sectors.

Quality control in Oil & Gas

Inox Tech Spa, that specializes in the production of welded tubes for the oil and gas industry, took on the challenge of ensuring maximum quality and corrosion resistance in its products.

Inox Tech elevated its quality control standards, achieving excellent results.

How did they do it?

They accomplished it by using state-or-the-art measuring instruments provided by S.A.M.A. Italia, such as the digital carbon fiber caliper, portable roughness tester, ultrasonic thickness gauge, ultrasonic thickness gauge through paint with included software, and industrial LED negatoscope.

Pipe manufacturing Inox Tech Spa

Quality control in the resale of paints


Benjamin Paints, a paint retailer in Romania, has selected our color assessment cabinet to ensure the precision of paint color consistency. This tool has proven crucial for verifying that products align with customer specifications, particularly in collaboration with the American manufacturer Benjamin Moore.

Color assessment cabinets are not exclusive to paint manufacturers; even retailers can employ this tool to validate product conformity for their customers. For example, a paint retailer could use a color assessment cabinet to verify that paint samples received from manufacturers precisely match the color specified by the customer. This approach allows the retailer to ensure that the products they offer are accurate and meet customer expectations.

Click here to read How to achieve the right paint color?  Case study:  Benjamin Paints.

Case study Benjamin Paints


Newsletter


Quality control in sheet metal production

Our third example is Dukometal SA.  It’s a Swiss company that is specialized in the production of stainless steel sheets and also offers high quality powder coating services.

By using SAMA Tools measuring instruments for coating thickness and adhesion control, Dukometal guarantees a final product of superior quality.

When addressing these kinds of quality control of coatings, it is essential to consider various factors. Comprehensive testing of the acquired coating is necessary to evaluate its resistance to cracking and peeling, achievable through the use of a cylindrical mandrel tester in compliance with ISO1519/ASTM D522/DIN53152 reference standards.

Furthermore, it is essential to verify the coating’s adhesion to ensure that the metal is not exposed due to detachment. therefore a cross hatch adhesion tester is recommended.  It is also important to check the coating thickness with a coating thickness tester to ensure uniformity.

If you want to explore the topic further, read Sheet metal manufactoring and quality control.

sama dukometal instruments

Quality control of the environment, health and safety and of the product

Our final success story brings us back to Italy with our client Ecol Studio Spa, who depends on S.A.M.A. Italia for the calibration of  it’s measuring instruments.  Guido Fornari, founder of the company and author of the 2019 book “Azienda, no problem”, knows the importance of choosing strategic partners that allow one to carry out their business in the best way possible.

Based on these premises, Ecol Studio has chosen S.A.M.A. Italia as a strategic partner for the purchase and calibration of measuring instruments since 2014.  The calibration and maintenance of Ecol instruments are performed in accordance with the reference technical standards and the recommendations of the control body (Accredia accredited tests).  This way, Ecol Studio can guarantee the maximum accuracy and reliability of its instruments.

Ecol Studio works with companies with ACCREDIA accredited analysis laboratories and is dedicated to various areas, such as accident and occupational disease prevention in the workplace and compliance with law and risk assessment for the production activity. It also helps companies comply with environmental regulations and improve their green and energy performance, offering reliable solutions and tests to create products and implement processes that comply with the required standards.

The article Ecol Studio Spa:  A storybook tale!, goes more into detail.

Ecol Studio: A success story

In the photo: Guido Fornari’s book with SAMA Tools pamphlet

In conclusion, we presented four success stories, covering a wide range of industries, from Oil & Gas to paint retail, sheet metal production, environmental, health and safety and product quality control.

All of these clients have found value in using our instruments and have achieved positive results in their respective fields.

We hope these stories inspire other companies to use our measuring and control tools to achieve equally positive results.

Read what many customers have to say about us, by clicking on the image below!


Feedback SAMA Tools

Measuring and calibration instruments are used by the Control & Quality departments of companies which operate in very different sectors.

DKC is a solid and well-established company that has been creating solutions and designs in the electrical engineering and industrial automation sector since 1998 and has chosen our instruments to guarantee even greater efficiency regarding a particular area of its production: cable holder systems, a debut in its field and still the flagship of the company.

The range of ducts and accessories for cable protection is characterized primarily by its versatility which, with high performance, allows the systems to be applicable in various sectors, from civil to industrial.

Therefore, versatility goes hand in hand with maximum accuracy and high precision standards.

The value of these characteristics emerges above all when it comes to small spaces or infrastructures where the cable-carrying systems determine proper operational activities. An example is the data processing centre, which requires optimal use of space to contain as much operating equipment within the permitted temperature range.

Therefore, it is through the control of precision levels, in regards to the production and installation of components for the protection of cables, that translates into high quality results.

But how can this process be guaranteed?

Measuring and calibration instruments. Production department

In photo: DKC production department

How to control accuracy during production and installation?

The answer to this question is simpler than many may think, since controlling accuracy only takes using highly accurate measuring instruments.

Of course, there are many measuring instruments for different purposes. For example, thermometers, speedometers, and even a simple clock are measuring instruments. But in order to control accuracy during the production and installation of infrastructure components, such as electrical installations, IT infrastructures and industrial automation elements, other measuring devices are required.

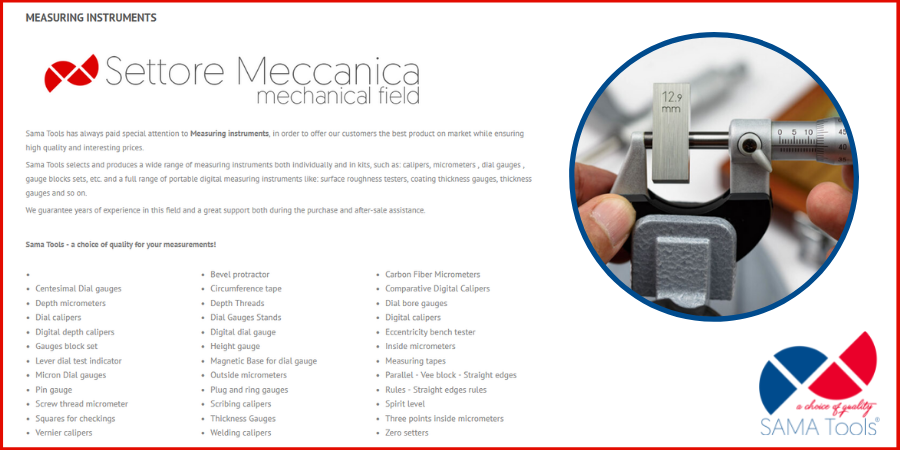
Some common measuring instruments used for the applications mentioned above include:

Measuring and calibration instruments. Mechanical field sama tools

In photo: SAMA Tools instruments list – mechanical field

How do measuring instruments guarantee accuracy?

In order get the highest accuracy from your measuring devices two important aspects need to be considered

Firstly, the chosen supplier must produce high quality tools based on international standards. With this in mind, we can proudly claim that SAMA Italia is UNI EN ISO 9001 certified and supplies measuring instruments ensuring both high quality and competitive prices.

Another fundamental element is instrument calibration. Calibration allows accuracy verification with reference to known samples, by reporting the difference between the value detected by the instrument and the known value of the reference sample to determine the accuracy of the instrument. Comparison should always be done on the basis of standards to guarantee compliance.

Once again, we are proud to say that we offer our customers a calibration service with laboratory test reports and/or ACCREDIA calibration certificates on our own product range or on equipment already possessed by your company.

High accuracy and high quality at DKC Group

With over 20 years of history and a DNA characterized by technological innovation, green transition, know-how and training, DKC Group is a point of reference for creating solutions and designs in the electrical engineering and industrial automation sector and has been active since 1998 with cable holder systems.

Thanks to a vision based on the evolution and innovation of the main international markets and a courageous acquisition policy, the Group has constantly grown and expanded its product line, such as cable protection and the distribution and accumulation of energy solutions.

Measuring and calibration instruments. DKC production

In photo: a particular of DKC production

The company currently offers its customers a wide range of solutions, which include:

  • Cable protection systems with metallic ducts.
  • Solutions for outdoor installations and LV systems.
  • Metal and plastic protection systems.
  • Air-conditioned rack cabinet systems for data management.
  • Energy transport and distribution solutions.
  • Solutions for electrical distribution boards.
  • Energy conversion systems.
  • Automation and energy distribution solutions.
  • Air conditioning solutions for electrical panels.

All these products are intended for the electrical plant engineering, distribution, IT infrastructure and industrial automation industries.

Therefore, DKC Group’s goal is to ensure high levels of precision, which translates into high quality in the areas mentioned above.

To ensure the achievement of the highest standards of accuracy, DKC Europe turned to us for the following supply of important measuring instruments:

Furthermore, DKC Europe has also chosen us for the calibration of instruments, in order to achieve the best performance with certified values, recognized by authoritative organizations, such as Accredia.

Measuring and calibration instruments. DKC particular production

In photo: DKC particular production – High accuracy

Final thoughts

Apart from measuring instruments such as calipers, dial indicators, micrometers and steel gauge blocks, we offer a wide variety of non-destructive testing tools for different purposes.

Because our mission is to support our customers in their quality control activities, we strive to provide them with the best solutions to satisfy their needs, as we have for DKC Europe.

DKC Europe is a good example that shows how customer satisfaction is our main goal and that we would be more than happy to see you become one of them.

Therefore, if you need help with measuring instruments to guarantee high accuracy and high quality or would like advice on the best instrument for your specific needs; do not hesitate to contact our technical department.

You can reach us at 0584/3923420584/392453 or, alternatively, contact us in writing at sales@samatools.it.